

This post contains affiliate links. Read my Disclosure Policy for more information.
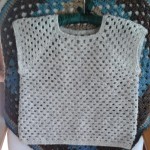
Tired of looking for and not finding that perfect crochet summer top pattern? I know I was. So I decided to design my own summer top. It’s easier than you think, and the results are stunning, especially when you combine a lacy stitch pattern and the perfect yarn with a simple design.
Here’s how I did it.
The “Recipe” Ingredients
I’m calling this design a “recipe” because it doesn’t include the row-by-row instructions you would find in a traditional pattern. Instead, I provide the main ingredients you’ll need to successfully design a crochet summer top, along with some construction tips on how to complete it.
For this recipe, you’ll need six ingredients –
- Your measurements
- Yarn
- A crochet hook
- A lacy stitch pattern
- A few swatches
- A simple design
Let’s take a closer look at each ingredient.
Your measurements
You’ll need the following four measurements for your summer top:
- Bust measurement divided by 2 (e.g., 42” bust divided by 2 = 21”). You divide by two because you’ll be crocheting the top in two squares, one for the front and one for the back.
- Armhole measurement. Use a comfortable top you already own to get this measurement. Lay the top on a flat surface and measure from the outer edge of the shoulder seam to the top edge of the side seam. I decided on an 8” armhole for this design.
- Neck measurement. Measure from bra strap to bra strap.
- Length from top of shoulder to bottom edge. Pretty self-explanatory.
My rough schematic ((see below under “A simple design”) includes all of these measurements. I used a top I already owned to get my measurements, so “ease” (discussed below) is already included in the bust measurement.
Yarn

Worsted-weight (#4 or 10-ply) yarn is probably going to be a little warm for a summer top. So I recommend using no heavier than DK-weight (#3 or 8-ply) yarn or lighter.
I realize now that the yarn I used is worsted-weight which is why the fabric is a little heavier than I would have liked. I explain how this can be fixed under “Crochet hook” below.
Whether you use an acrylic or natural fiber is up to you. I chose a 100% cotton yarn because I got it for FREE and decided this top would be a good use for it.
On the other hand, I’ve been told by friends who know yarn that 100% cotton isn’t the best choice for garments. Cotton has no memory, so you can’t block it, and it tends to stretch out of shape when you wear it. I’ll probably use a cotton blend or mercerized cotton for my next top to avoid these issues.
How much yarn will you need? Honestly, I prayed that I would have enough yarn to complete this top! I just squeezed by with the 900 yards I had on hand.
June Brown of JuneeB Designs did a quick search on Ravelry for me of the top crochet patterns using a lace stitch and DK- or lighter-weight yarn (thanks, June!). These patterns use between 500 and 700 yards. Use this amount as a starting point for your top. And remember, the closer the stitches are, the more yarn you’ll need; the lacier the stitch, the less yarn you’ll need.
For those who want to be a little more precise, The Crocheter’s Handy Guide to Yarn Requirements uses a combination of gauge, bust measurement, and yarn weight to provide a fairly accurate estimate of how much yarn you’ll need.
It’s better to overestimate yarn quantity instead of underestimating it. So if you’re not sure, purchase an extra skein or two.
A crochet hook

Your choice of crochet hook size is going to depend on how “dense” you want your fabric to be. The larger the hook, the lacier and looser the fabric will be. This is why I suggest you create several …
Swatches
Okay, I can hear your groans all the way over here in Hawaii. But swatching is pretty important, especially if you want to know how your fabric is going to drape or hang on you.
Confession time – I did not create a swatch for this top. If I had, I would have realized that the fabric resulting from my worsted-weight yarn and F/3.75 mm hook is just a tad too heavy. A larger hook would have resulted in a looser fabric that drapes a little better than this top does.
Don’t get me wrong; I’m happy with my end result, but you better believe I’ll be swatching from here on out.
Tip – Make a swatch that’s at least 8 – 10” by 8 – 10” to get a good feel for how the fabric is going to drape. Purchase an extra skein of yarn to use for swatching.
A lacy stitch pattern
If you don’t have a stitch dictionary, now is the time to get one (or two or three!). This is where you’re going to find all of the lovely, lace stitch patterns for your tops.
The best stitch dictionaries include a symbol chart with each stitch pattern. Any confusion with written instructions is often cleared up with a decent symbol chart.
Here are a few stitch dictionaries I recommend –
- Crochet Stitch Dictionary: 200 Essential Stitches with Step-by-Step Photos
- Crochet Stitches VISUAL Encyclopedia
- And the classic Harmony Guide to Crochet Stitches
Another great place to find stitch patterns is Pinterest. The search term “crochet stitch patterns” yields more enticing patterns than you’ll be able to use in a lifetime!

I used the stitch pattern in Doris Chan’s Kolika Top pattern (check out her Interweave course if you’re looking for a more challenging crochet top design). The pattern is a simple two-row repeat that you can crochet in your sleep, yet results in a lovely, lacy fabric.
A simple design

The simplest design I’m aware of is two squares, one for the front and one for the back. To those squares, you can add straps to create a neckline or leave them off for a “boat neck”.
My front square is two rows shorter than my back square. This allowed me to create straps and a square neckline.
- To the front square, I added 4 rows in the stitch pattern for each strap.
- The back square has two extra full rows in the stitch pattern and 2 rows for each strap.
You end up with the same number of rows (including the strap rows) for the front and back.
Construction Tips

- It’s a good idea to plan out your design before you begin crocheting. Your plan doesn’t have to be overly complicated, and it’s not etched in stone. You’re free to make changes as you crochet if you find something doesn’t work.
- Consider how tightly or loosely you want your top to fit. It will be “form-fitting” if you use your exact bust measurement. For a looser top, add some inches to your bust measurement. This creates positive ease. The more inches you add, the looser the top will fit. For a really tight, form-hugging top, subtract an inch or two from your bust measurement. This is called negative ease.
- For each square, start with a foundation chain that is the length of ½ your bust measurement plus/minus ease. Be careful not to stretch the chain as you’re measuring it. To that chain, add a few more inches. Then simply begin the stitch pattern and crochet until the first row is the same length as ½ your bust measurement +/- ease. If there are extra chains left over, simple take them out.
- When you’re finished with both squares, consider adding a single crochet edging around the outer edges. This makes it a lot easier to match stitches on the front and back when it’s time to sew shoulder and side seams together. I didn’t have much yarn left after completing my two squares, so I added a “single crochet, chain-3” edging along the side, shoulder, and neck edges.

A Huge Assortment of Tops from One Simple Design
Stitch patterns + Yarn + Color + Hook Size = A WHOLE LOT OF crochet summer top designs!
This one simple design will give you an entire wardrobe of summer tops that are fun to make and work up quickly. Once you have one top under your belt, designing and crocheting additional tops will be a piece of cake.
Let me know in the comments below if you have questions about this design.

17 comments On Design Your Own Crochet Summer Top
Thank you! I’ve been designing patterns but had yet to do a top. Now I think I’ll give it a go.
You’re welcome, Kathryn! Let me know if you have any questions 🙂
Pingback: Hookin' on Hump Day #98: Link Party for the Fiber Arts - Petals to Picots ()
Thank you for this information. My son has been encouraging me to design a pattern for a top, sweater, blanket or something. I have some yarn but I can’t find a pattern that is worthy of using this yarn. Now I have some basic information to start designing a top.
That’s great to hear Mary! Let me know if you have questions.
Thank you sooooooo much for this free tutorial
I too cannot find a nice summer sweater nor one that will fit me. ( 3x )
yours is BEAUTIFUL!!!!!!!!!!!!!!!!!!!!!!!!!!!!!!!!!!!!!!!!!!!!!!!!!!!
Hey Gail, thanks so much!! Glad you’re finding the tutorial helpful. Let me know if you have questions 🙂
Moogly sent me . . . and I’m sooooo happy I visited. Thank you for sharing can’t wait to get started.
Jojo
You’re welcome Joanne! Let me know if you have questions 🙂
Hi Patrice,
I came across this page through Moogly’s HOHD link.
I think there can’t be a better and simple explanation than what you have given ! I liked it !
I think I am going to try and experiment some ideas using various stitch patterns 🙂
I have a question, and I hope you can help me understand better !
The top that you have created has a basic construction of the neck, without much tweaking required.
However, if I were to create a rounded design or I need to give a V shape or any other design,
how do we create those rounded, curved or V edges ? I have just completed one top for my child using this very basic neckline by following another YouTube video, and I want to design on my own using your method, but give a different neckline…so I would appreciate any tips from you on this, or maybe another post ? Thanks !!! 🙂
Hi Niko. Thanks for your question. Creating different necklines will depend on the stitch pattern you’re using. For this particular top, I chose a neckline without shaping because that was the easiest neckline to create, given the stitch pattern. You can create a rounder neck for this top by crocheting a few rounds of single crochet edging around the entire neckline. Except that on the first round, when you get to the corner skip or decrease a stitch and then keep crocheting until you get to the next corner, then skip or decrease a stitch and so on around. On the next round, you do the same thing, skipping/decreasing a total of four stitches total where the corners were. Hope that made sense. This should make the neckline rounder.
For v-necks, you’ll have to make two sections, one for the left and right fronts. Then experiment to find a way to make decreases along the neck edge of both sides to form the “V”. They should be mirror images of each other. Sorry I can’t be more specific. Again, it depends on the stitch pattern you’re using. Lily Chin’s book, Couture Crochet Workshop, explains in more detail how to create increases an decreases when you’re working with a lacy stitch pattern.
If you find a simpler way to create your tops, by all means go for it. My article was designed to get crocheters thinking about ways to create their own tops and provide one way of going about it. Good luck.
Pingback: An Easy-to Learn, Top-Down Crochet Construction Method | Yarn Over, Pull Through ()
Pingback: Hookin' on Hump Day #98: Link Party for the Fiber Arts | Petals to Picots ()
Omgosh, such a help. I’ve been trying to make a top for my daughter. Trying to find a pattern with the yarn she bought, hasn’t been easy. Now with this great article I may be able to do this.
I do have a question, I do hope you will help. I made the chain to half the measured bust size which is 28.5 inches. Then added an extra 1.5 inches. Each row I complete it seems to get longer. At one point it measured 33inches across. Is this normal & how do I fix it if it isn’t? I don’t need the piece for one panel ending up to be 80inches.
Thank you again for a great article.
Glad you found the article helpful. I wrote it in 2015 so I haven’t looked at it in a while. Are you following the stitch pattern in the article or another one? Do you mean the piece is getting wider as you crochet? If that’s the case, you could be adding stitches or your tension could be getting looser. Send me a photo at patrice@yarnoverpullthrough.com so I can get a better idea of what’s going on.
Hi, thank you, I ended up realizing, that there was an issue with my design & hook. Once I dropped my hook size the piece stopped growing.
Wonderful, Terri, glad to hear it!
Sliding Sidebar
Categories
Privacy Overview