
This post contains affiliate links. Read my Disclosure Policy for more information. Thanks for your support!
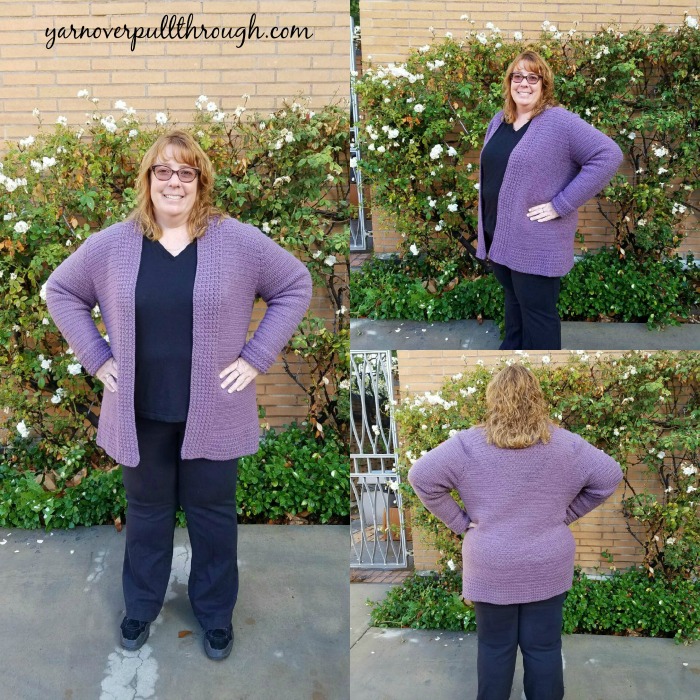
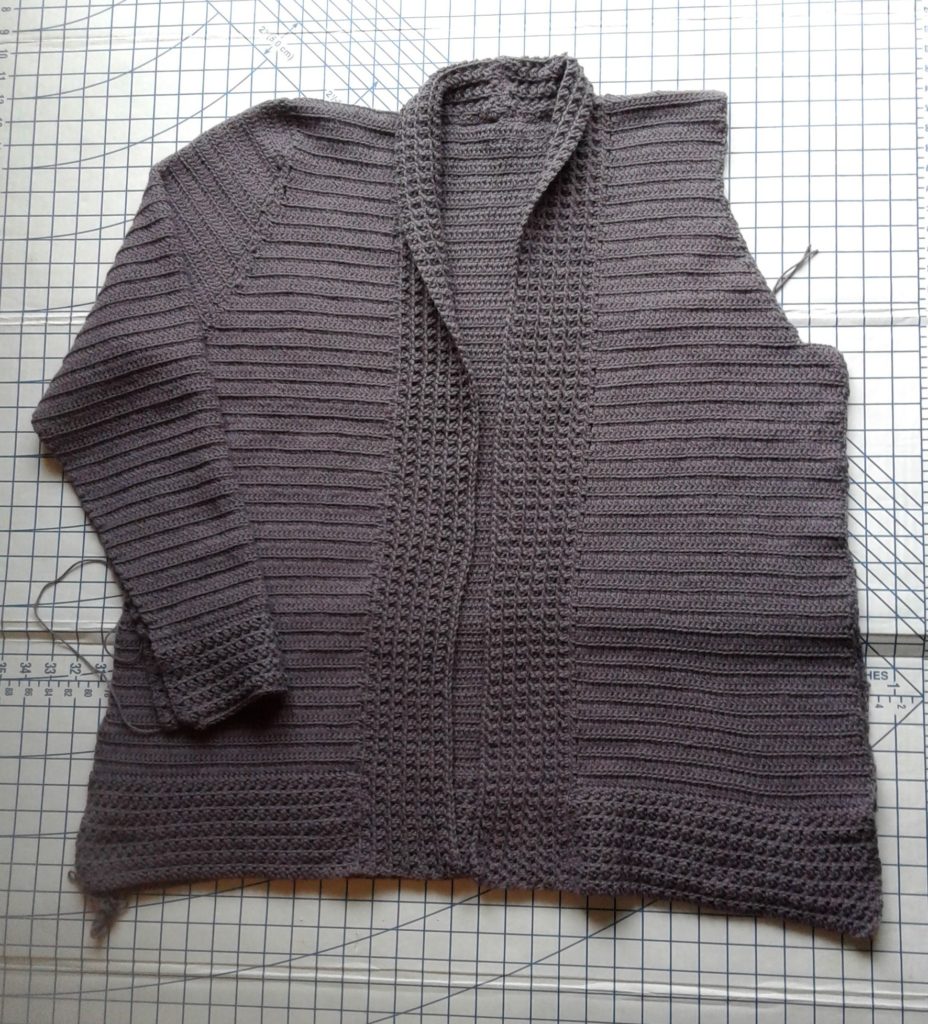
I recently finished a commissioned piece for a customer which was to crochet a sweater for her. This was the second of two projects I did for her, the first being the Chevron Lace Wrap I wrote about earlier. That blog post included tips on how to price a commissioned piece. In this blog post, I’m going to focus more on the process I went through to create the sweater for her.
Deciding on Yarn
We needed to first decide on the yarn to use for this project: the pattern yarn or a substitute. After considering a number of options, my client sent me a skein each of the pattern yarn and a cotton substitute. I worked up swatches of both, blocked them to make sure I could get the blocked pattern gauge, and sent them to her. She chose the pattern yarn, Berroco Vintage Dk, a nice blend of acrylic (52%), wool (40%), and nylon (8%) that’s machine wash- and dryable.
Measurements Are Critical
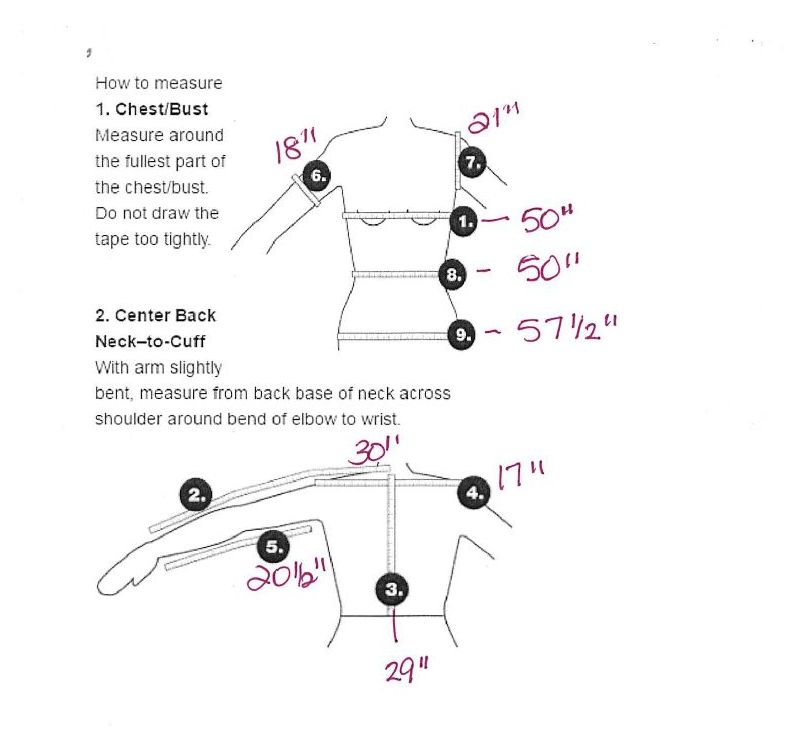
Next, I wanted to make sure the size she chose would actually fit her. This meant getting her measurements and comparing them to the measurements of the sweater pieces (back, two fronts, sleeves) on the pattern schematics. Since she’s in California and I’m in Hawaii, she wasn’t available for me to measure her, so she did them herself, wrote them on a schematic I sent her, and emailed it back to me.
Even though we knew which size sweater would fit her based on the actual and finished bust measurement included in the pattern, I wanted to be sure ALL of her measurements matched or came as close as possible to the measurements on the pattern schematics. Otherwise, the sweater might not fit properly.
Crocheting the Sweater
With all of this information in hand, it was time to start crocheting. But that wasn’t as easy as it sounds. The pattern was easy to follow; it includes two fairly simple stitch patterns and some increasing and decreasing. It was probably assigned an intermediate skill level because of the need to sew the five individual pieces together, including set-in sleeves.
The main problem I had crocheting this sweater was the hook size – 4.25 mm. I had that size in my hook collection, but it’s a Boye (tapered-head) hook and I prefer and am used to crocheting with Susan Bates (inline-head) hooks (here’s an article that explains the difference).
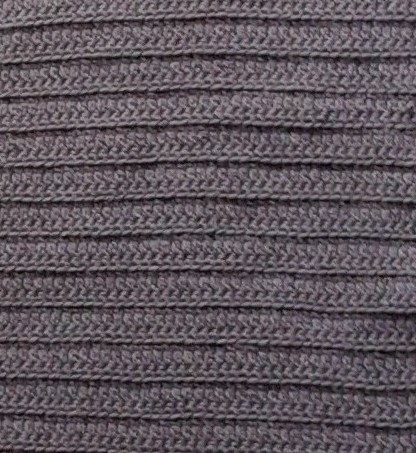
I tried to use the Boye hook, but I kept splitting the yarn. So I switched to a 4 mm Bates hook and lengthened my stitches a bit to create stitches that one would get using a 4.25 mm hook. I had to continually check my stitches to make sure I was crocheting the same size stitch in each piece. This slowed me down a bit, but I wanted to make sure I was crocheting to gauge.
Sewing the Pieces Together
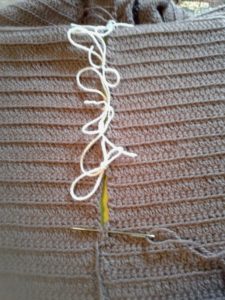
Once I had all the pieces crocheted, it was time to sew them together. Because the stitch pattern formed horizontally lines across the pieces, I had to make sure the lines on the fronts and back matched. Instead of using stitch markers, I bow-tied the seams together with yarn to keep those lines matched. The bow ties made it easy to remove the yarn when I needed to.
I learned the locked mattress stitch in a wonderful course presented by Shannon Mullett-Bolsby called Crochet Garment Design at Craft Online University.But for this project, with it’s somewhat long double crochets, it didn’t work as well as I would have liked. So I switched to my trusty whip stitch which worked fine on the side seams. But sewing the set-in sleeves was another matter entirely.
Part of the problem was the way the pattern formed the decreases (by skipping the next to the last stitch instead of joining the last two stitches to create a decreased stitch). Skipping the next to the last stitch left holes in the fabric which I really didn’t like. So I did my best to close them as I whip-stitched the sleeves into the body of the sweater.
The easiest way for me to set in sleeves is to:
• Sew the sweater back and fronts together at the shoulder seams, without sewing the side seams.
• Pin the sleeves in, matching the center of the top of the sleeve with the shoulder seam; then sew the sleeve to the front and back of the sweater.
• Once the sleeve is in place, sew the side seams and continue sewing the sleeve seam.
To be honest, my OCD-anal-retentive perfectionism keeps me from being completely satisfied with those set-in seams. But my customer loves the sweater, so I probably need to lighten up a bit.
To Block Or Not
You probably noticed that I did not block the individual pieces before sewing them together (don’t be mad at me, Shannon!).
Throughout this entire project, I went through mucho angst trying to decide if I should block the individual pieces. If I’d had the right equipment, namely a steamer and adequate space, I would have blocked them. But I don’t. I also didn’t want to use a steam iron for fear that the iron would accidentally touch the fabric and damage it. And I didn’t feel like wet blocking them.
But while I was crocheting, an image flashed on the inner screen of my mind of me machine washing and drying the completed sweater. That was my intuition telling me it would be okay to block in this manner. And that’s exactly what I did. Thankfully, my washing machine has a delicate cycle which is as close to hand washing as you can get in a washing machine.
I used a little bit of sensitive-skin laundry detergent and washed the sweater with a bed sheet. I then dried it, along with the sheet, on a low heat setting with a fabric softener sheet. I included a bed sheet, figuring it would protect the sweater from getting caught on something in the washer or dryer. I must say, the Berroco Vintage DK yarn washes and dries beautifully!
A Satisfied Customer?
I can’t tell you how nervous I was once I shipped the sweater to my client. I confess – I’m a worrier (probably that darn perfectionist monkey on my back). But, I needn’t have worried. Here’s what she had to say.
“I commissioned Patrice to crochet a sweater for me. I could not be happier with the finished product, it fits PERFECTLY! Her work is amazing!! Patrice is detail oriented and will ensure that the piece not only meets your expectations, but exceeds them; her skill level is top notch. I will definitely be ordering more items from her! I am thrilled with my sweater and love wearing it!!” — Karen Z.
Okay, so much for worrying.
I hope this gives you some idea of what’s involved in doing work on commission. Because this project took three months to complete, I made sure to send Karen updates, with pictures, on my progress. I didn’t want her to think nothing was happening. Frequent communication is an integral part of customer service that will go a long way in getting you referrals and repeat work.
You can find the Stark Cardi pattern here.
1 comments On Stark Cardi – A Commissioned Crochet Project – Part 2
Pingback: Designing Crochet Wraps Is Easy | Yarn Over, Pull Through ()