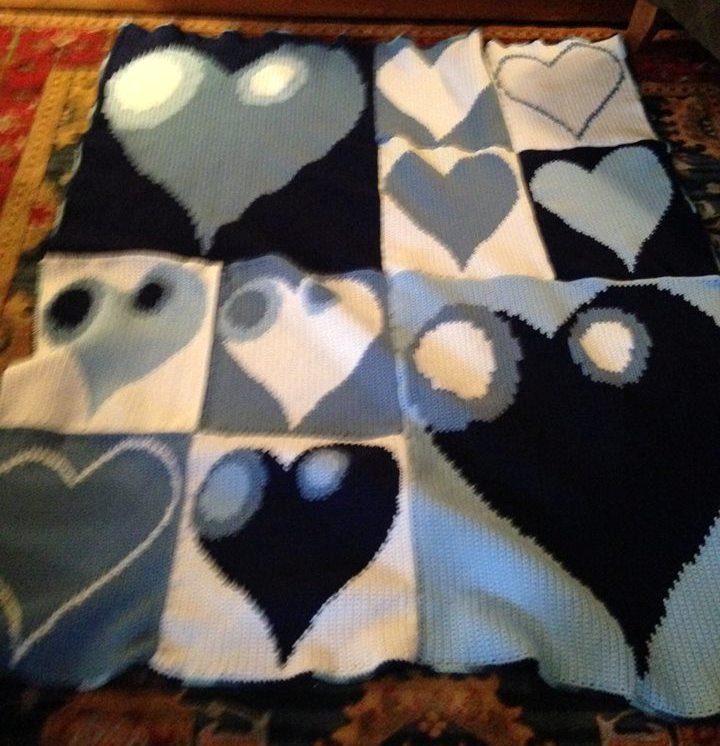
My crochet photo pattern customer, Lisa Murchison Collins, designed this beautiful afghan, using my Heart crochet photo pattern (the link to the pattern is at the end of the post).
She put a lot of planning and work into the design and graciously agreed to share how she modified the pattern to create the different hearts. I show her design notes in italics and offer some commentary that I hope will help you recreate these hearts.
Note: This Heart is crocheted vertically. You can also use bobbins and “carry the yarn” instead of using the “cut and tie” method to change colors since you are only working with four colors or less.
THE LARGE HEARTS
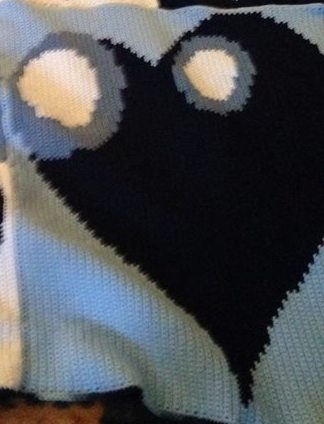
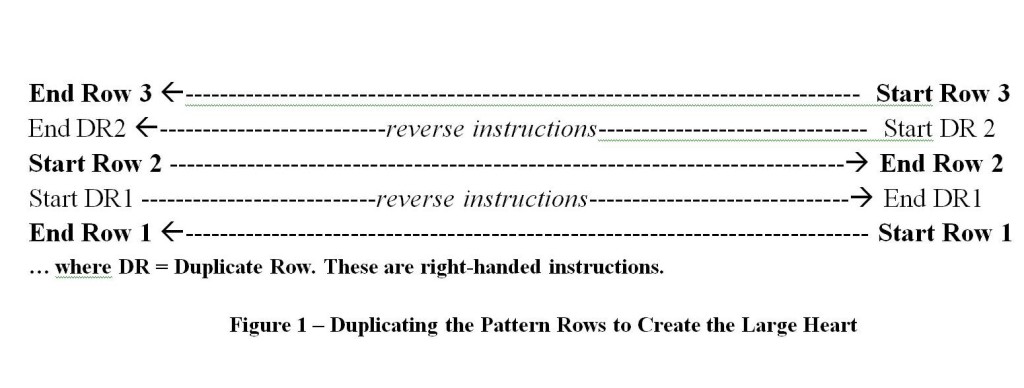
Creating the large heart is a matter of doubling the number of stitches and rows in the pattern. So for every stitch in the pattern, Lisa did two, and then worked that row a second time.
For example rows 1 and 1a (the duplicate row) were 120 stitches in C0; pattern row 2 was 30 in C0, 20 in C2, and 70 in C0; row 2a (the duplicate row) was 70, 20, 30, so that the color changes match up.
In other words, you reverse the pattern instructions in the duplicate row, going from the last color/stitch set to the first. In this way, all of the colors will line up. Lisa adds …
In addition, duplicating the row always results in starting the next new row on the opposite side from where you would normally start it. Instead, you start a new row on the side of the piece where you started the previous duplicate row.
This duplication process is illustrated in Figure 1 below.
To summarize –
- Duplicate each stitch in the pattern row.
- Then crochet that row again (duplicate row) but reverse the order of the stitches in the pattern instructions.
- Begin the next new row at the opposite side of the piece, where you began the preceding duplicate row.
You’ll have some ends to weave in, but this shouldn’t take much time. Or you can crochet a border around the finished piece and crochet over these ends as you go.
THE SOLID HEART
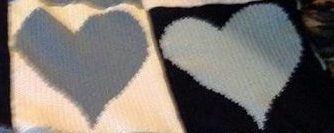
These and the outline hearts are regular size hearts (60 rows and 60 stitches) that don’t require any duplication because they aren’t enlarged.
The key to the hearts without shading is that C0 was always consistent with your pattern as written. For the solid ones I simply added all the inside stitch counts together.
In the pattern, C0 is the background color. The heart colors are the three shades of red – C1, C2, and C3. Start each row with the C0 stitches. Add up the heart-color stitch counts and crochet that number of stitches in another color to create the solid heart. Then change to C0 and finish the row.
THE OUTLINE HEART
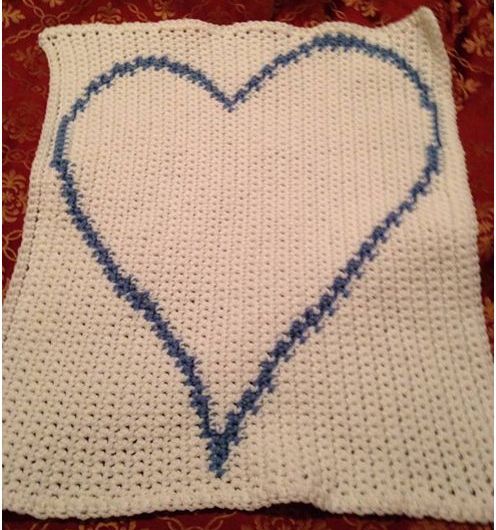
In the Outline heart, the background color is C0; the outline color will be either C1 or C2 in the pattern instructions.
The outline ones were slightly more complicated but again, C0 is always as written (i.e., C0 is always the background color; use the number of stitches for C0 that the pattern calls for). Row 2 was as written as well. For row 3, I started C1 (i.e., the outline color) as normal but only used it until it overlaps the C1 from row 2 by one stitch; change back to C0 until there is one of the previous row’s C1 left; C1 until C0 is supposed to start; finish with C0 as written.
Thus the outline color of a given row always shares one stitch with the outline color from the previous row. … In some cases … I had to look ahead to the next row to calculate how many of the outline color would get me to that “overlap by one stitch” location.
To create the pattern-size outline heart:
- Complete Rows 1 and 2 according to the pattern. Row 2 is the beginning of the heart outline.
- Row 3 and succeeding rows always begin and end with C0, the background color. The heart outline unfolds between these two colors.
- The color changes you have to be most concerned with are the ones that occur between the beginning and ending C0s. These are used to form the outline of the heart against the background color.
Figure 2 below illustrates how this is going to work.
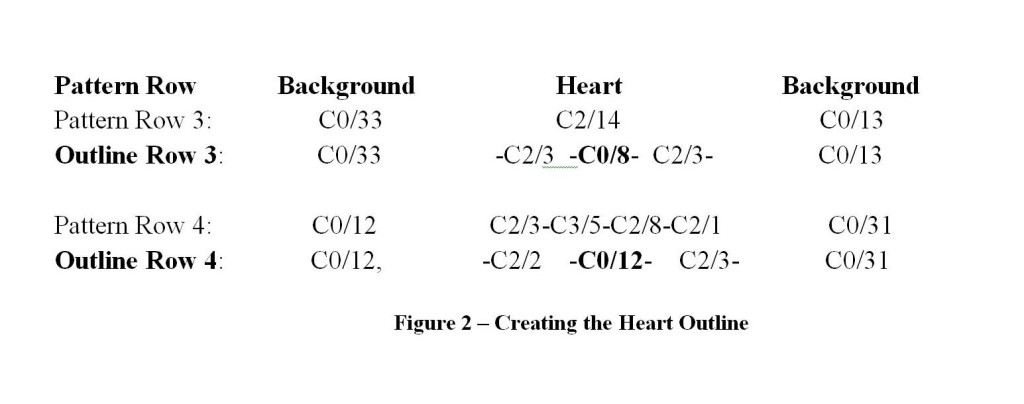
For each row, count the number of stitches from the first heart stitch to the last heart stitch. The number of stitches you use to create the outline and interior background should be the same number of stitches between the beginning and ending C0 in the pattern instructions.
For example, in Pattern Row 3, there are 14 stitches devoted to the heart. In the outline row, there are also 14 stitches that form the heart. The bold C0/# in the Outline Rows is the background color inside the heart.
Two Ways to Make the Outline More Solid
Lisa’s Way
Because the image includes diagonal lines, Lisa made sure that –
“… the outline color of a given row always shares one stitch with the outline color from the previous row.” … It just looked better to me for the outline color to touch from one row to the next, rather than starting the stitch after. [The outline] just looks more connected in my opinion.”
For example, if an outline stitch on the next row begins a stitch before or after the outline stitch began on the previous row, then you copy the outline stitch from the previous row (the overlap) and then make the outline stitch the pattern calls for.
Another Way
Or you can follow the pattern as it is written, and …
- Crochet the background (C0) stitches.
- Change to the outline color after crocheting the last background stitch.
- Crochet the first heart stitch which is your outline stitch.
- Change back to the background color and crochet the interior heart stitches.
- When you reach the last heart stitch before the background color begins, change to the outline color and crochet the last heart stitch.
- Change back to the background color and crochet the C0 stitches to the end of the row.
If the outline looks “jagged,” you can use surface crochet to make the lines smoother. Here’s an article that explains how to do this.

It’s going to take some planning to create these hearts, but it’s worth the effort when the end result will be an afghan as spectacular as Lisa’s. You can download my Heart crochet photo pattern HERE to get started.
If you’ve never done a crochet photo pattern before, use my free Butterfly pattern to practice until you feel confident in tackling a pattern with more colors.
This post contains affiliate links. Read my Disclosure Policy for more information. Thanks for your support!