

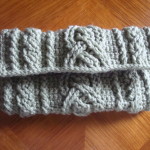
A while back, I wrote a blog post that describes three ways to felt your crochet and knit projects. Included in that post was a photo of a bright magenta clutch that I felted in the dryer.
Here’s the pattern I used to create the clutch. Thanks to Mari Weber of Cali Crochet for kindly testing this pattern. Be sure to read my Copyright Policy which explains the terms and conditions for using this pattern.
Felted Crochet Clutch
Designed by Patrice Walker
© Copyright 2015, All Rights Reserved
https://www.yarnoverpullthrough.com
Skill Level:
![]()
Finished Measurements for Closed Clutch:
Pre-felted measurements – 9” wide x 5” long
Measurements after felting – 7.25” x 4” long
Gauge: 15 hdc and 12 rows = 4”
Materials
Cascade 220, 3.5 oz/100 g, approx 220 yds/200 m (100% Peruvian Highland wool), 1 hank in Magenta (#7803)
Size H/9 (5 mm) crochet hook or any size to obtain the correct gauge
Yarn needle
Stitch markers
Button
Sewing needle
Matching or contrasting thread for sewing on button.
Abbreviations:
ch = chain(s)
hdc = half double crochet s
hdc2tog = hdc 2 together
pm = place stitch marker
sc = single crochet
sl st = slip stitch
st(s) = stitch(es)
WS = wrong side
Notes:
1. Feel free to substitute another yarn for the pattern yarn; just make sure it is 100% wool or the clutch won’t felt.
2. The clutch body is crocheted in the round; do not turn at the end of the round. The flap is crocheted in rows.
3. Place a stitch marker in the first and last chains of the foundation chain so you know where to make your increases in the first round.
4. For the beginning round, place your hook in the top loop only of the ch so that you can crochet on the other side of the ch to complete the round.
5. The beginning ch of each round and row does NOT count as the first hdc. Elongate the beginning ch-1 slightly to bring it up to the height of the first hdc.
Instructions:
Ch 24
Clutch Body
Round 1: 1 hdc in 3rd ch from hook and in each ch until you reach the next to the last ch, 3 hdc in last ch, 1 hdc in each ch on the opposite side, 2 hdc in the 1st ch, sl st to 1st hdc (48 sts).
Round 2: Ch 1, 2 hdc in same st as sl st, 1 hdc in next 20 sts, 2 hdc in each of the next 3 sts, 1 hdc in next 20 sts, 2 hdc in last 2 sts, sl st to 1st hdc (52 sts).
Round 3: Ch 1, 1 hdc in 1st st (pm), 1 hdc in each st around, sl st to 1st hdc (52 sts).
Rounds 4 – 12: Repeat Round 3. Do not fasten off.
Flap
Row 1: Ch 1, 1 hdc in 1st st, 1 hdc in each of the next 24 sts, turn (25 sts)
Row 2 – 5: Ch 1, 1 hdc in each st across, turn.
Row 6: Ch 1, hdc2tog, 1 hdc in each st to the last 2 sts, hdc2tog, turn (23 sts).
Row 7 – 8: Repeat row 6. You should have 19 sts at the end of row 8.
Row 9: Ch 1, hdc2tog, 1 hdc in next 7 sts, ch 1, skip 1 st, 1 hdc in each st to last 2 sts, hdc2tog (17 sts). Fasten off.
Flap Edging
With WS of flap facing you, attach yarn to flap where it meets the top round of the clutch body. Sc evenly around the outer edge of the flap, placing 1 sc in the ch-1 space over the skipped st. Fasten off. Weave in ends.
Felting
Read this article for detailed instructions on how to felt the clutch in the dryer. Sew on button AFTER felting.
You can purchase a downloadable, ad-free copy of this pattern HERE.
This post contains affiliate links. Read my Disclosure Policy for more information. Thanks for your support!

1 comments On Free Pattern: Felted Crochet Clutch
Pingback: 3 Ways to Felt Your Crochet Projects | Yarn Over, Pull Through ()